Distal Radius Fractures
Anatomy
The radius is one of the two forearm bones which extend from the elbow to the wrist, the other is the ulna. The radius is involved with four joints – at the elbow, the upper radio-ulnar joint, the lower radio-ulnar joint and the wrist (radio-carpal) joint (see figure).
Fractures of the lower (distal) radius are very common in all age groups. The pattern of the fracture can vary considerably. The path of the fracture line(s) may involve the wrist (radio-carpal) or lower (distal) radio-ulnar joints, in which case is it known as an intra-articular fracture. The alignment and stability of the fracture fragments is very important in determining the outcome of the fracture, and whether surgery has a role in optimising the outcome.
It is very rare for a fracture to not heal. Much more common is that the fracture heals in an abnormal position. In active patients, a radius with an abnormal shape will often lead to mal-alignment of the upper and lower radio-ulna joints, which either restricts forearm motion or leads to abnormal motion (instability) of the lower joint. Usually, if the radius heals in a deformed position, this will cause relative shortening of the radius, compared with the ulna. The wrist bones follow the radius, and the ulna forces its way into them, causing “ulno-carpal abutment”, a common cause of persistent wrist pain following distal radius injuries.
Displaced fractures involving the joint surface of the radius have great potential to cause wrist stiffness as well as post-traumatic arthritis.
The wrist is the narrowest part of the limb, but also the passageway of many soft structures, such as tendons and nerves, to the hand. Therefore, the soft structures are closely opposed to the skeleton, and so prone to injury or irritation by deformed bones, swelling or surgical implants in the area.
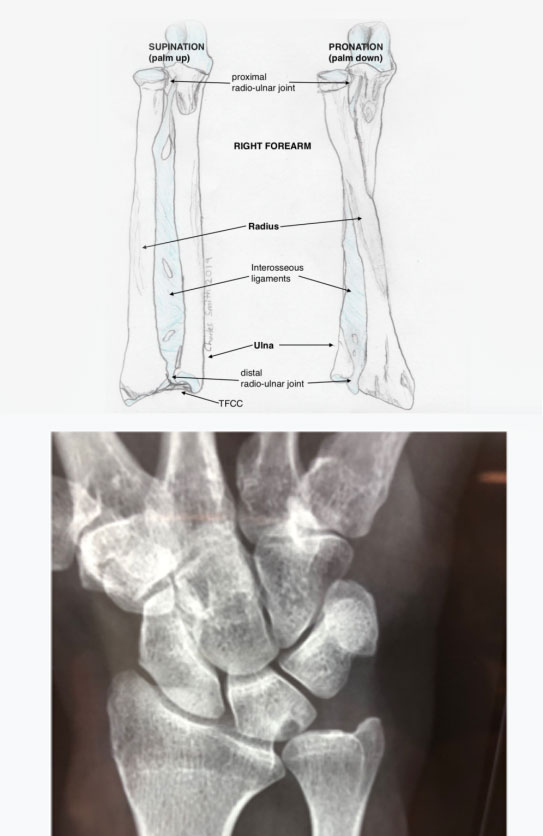
Top: anatomy of the forearm, Bottom: X-ray of ulno-carpal abutment, where the ulna is too long
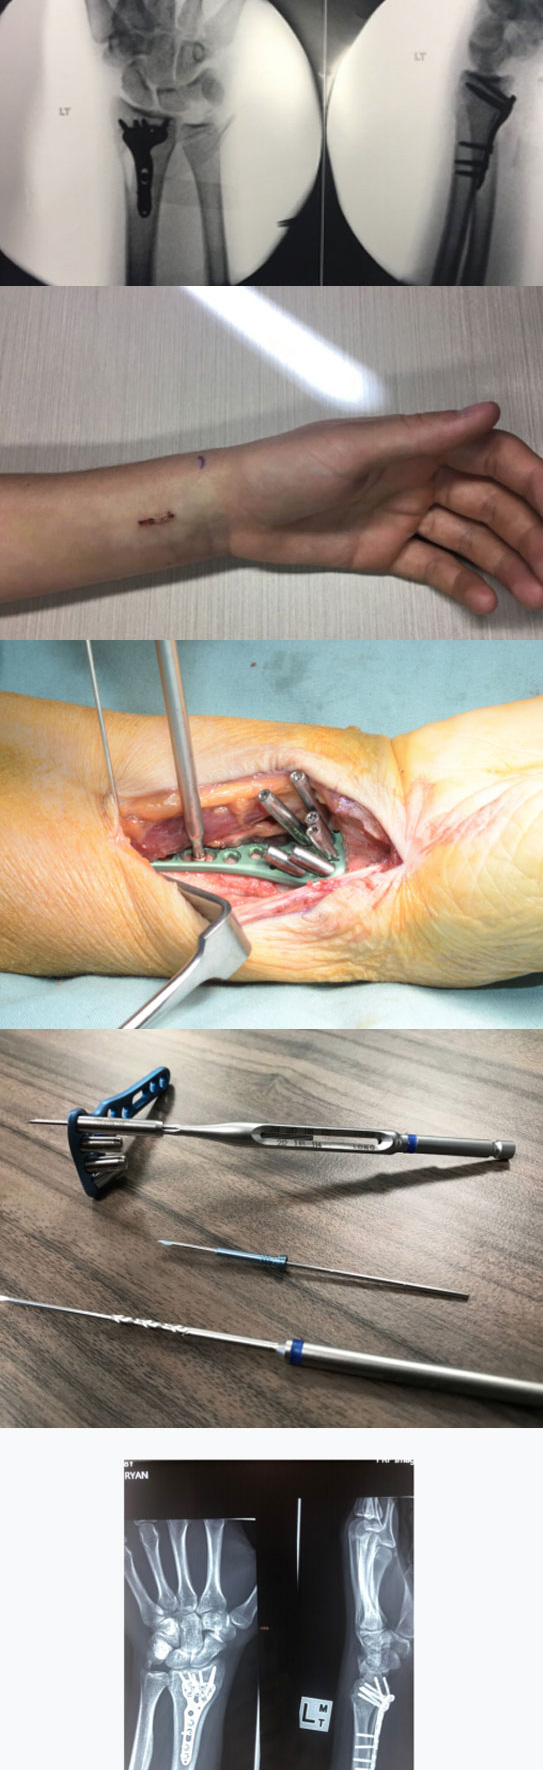
Top: X-rays of minimally invasive volar locking plate, Second: wound after minimally invasive volar locking plate, Third: stepwise system for arthroscopic assisted reduction of intra-articular distal radius fracture, Fourth: stepwise system, including cannulated drill and locking peg, Bottom: X-rays of a fracture treated with the stepwise system
Goals of Treatment
If I had a distal radius fracture, obviously I’d be in pain, but I’d be hoping that at some point in the future I’d be as close to normal as possible. My goal in treating a patient with a distal radius fracture is just that, getting them as close to normal as is possible. What’s required for that? It’s easy to say in medical terms first of all: anatomical reduction, stable fixation, early motion, minimal additional surgical injury, and minimising complications. If these goals can be achieved, then it has to be more likely that the patient will get closer to normal.
Let’s look at these goals in turn:
- anatomical reduction – this means restoring the shape to normal. Rather than seeing if the patient can cope with a crooked skeleton, or at least doesn’t complain too much, I view my role as helping patients maximise their chances of returning to their desired level of function. In most cases, my patients wish to attempt to return to as close to normal as possible. On an individual basis, this is most likely if we can return the skeleton to its normal shape and hold it there until it has healed. Usually, this means an operation to “reduce” or correct the shape and “stable fixation” to hold the correction. Usually this is only required for the overall shape of the bone, though about 35% of fractures will enter the joint surface of the radius, which in my hands is best managed with an arthroscopic assisted reduction (see minimal additional surgical injury).
- stable fixation – this means using special titanium implants to hold the broken bone in its correct alignment until the bone is healed. Patients today have the advantage of many previous evolutions of fixation for the distal radius. While there are multitudes of implants available, the latest available come with modifications based on the latest understanding of fracture behavior, surgical techniques and complication profiles.The vast majority of distal radius fractures can be stabilised, with the latest plating systems, on the palmar side only. With careful positioning of the implant, the fracture will be stabilised, and the implant “invisible” to the body (see minimising complications).
- early motion – once the bone has been returned to its normal shape and stabilised, it’s time to move! That’s on the day after surgery, for most of my patients. The goal is to have regained normal motion in the joints before the bone has healed. Then, once the bone has healed, usually by 8 weeks, the patient will feel very close to normal
- minimal additional surgical injury – this recognises the fact that surgery is an injury. Minimising further injury means careful surgery, and less invasive surgery. For example, in a fracture which has damaged the joint surface, it is possible to use arthroscopy (see wrist arthroscopy) to accurately evaluate and correct the joint, without further damaging the joint. Prior to this technique, we had to either open the joint capsule, or ignore the joint surface, both of which often led to an additional loss of motion of the wrist.I have furthered the ideas of others in creating the “Stepwise” method of arthroscopic assisted reduction for intra-articular distal radius fractures. To facilitate the technique, I have also designed a specific internal fixation system which is currently at the cutting edge of internal fixation systems for the distal radius (see pictures).
- minimising complications – performing volar locking plate (VLP) surgery for distal radius fractures is performed commonly. To minimise complications, the surgeon must pay careful attention to many subtle details which can be potent causes of problems. This is a surgical procedure which is difficult to perform well – minimising complications requires specific training, ongoing subspecialty education and a real interest in the area of hand and wrist surgery.Most of the complications related to VLP surgery are avoidable, with attention to detail. For example, rupture of tendons may be caused by screws that are too long, plates placed incorrectly or some of the previous evolutions of plates, which are still commonly in use in some institutions.Giving patients the best possible outcome after wrist injuries is one of my main interests, both in the clinic and in research. An important part of this interest is minimising complications.
The Patient’s Job After Surgery
1. Getting rid of the swelling.
Swelling is fluid that has left the bloodstream and is lying in the “soft tissues”, that is the soft parts of us, muscle, fat, ligaments surrounding the bone. It occurs after every injury, both from internal bleeding and from leaky capillaries (fine blood vessels) which let the fluid out.
Swelling after wrist fractures can cause restriction of motion of the fingers and wrist, just by getting in the way. The proteins in the fluid can also “set” and further restrict motion.
The sooner the swelling is out of the area, the better. This is best achieved initially by elevating the hand. The swelling is then driven by gravity towards the elbow, and away from the wrist and fingers. I tell my patients that it’s like hanging up a wet towel. Leaving the hand hanging down is like leaving the towel in the bath, it just makes things worse. Leaving the arm in a sling is like leaving the wet towel on the ground, it doesn’t get better or worse. Putting the hand vertically up is the best option.
Squeezing the fingers into a fist will help squeeze fluid out of the fingers and forearm. The muscles in the forearm act as a pump and pressure in the fingers helps drive the fluid out. Initially, this should be done almost constantly during waking hours.
Nobody can do a better job of decreasing the swelling than the patient themselves. Gloves and sleeves and other passive devices can be of help in certain circumstances, but an active self-directed approach is the most effective.
2. Regaining motion.
Move it or loose it! Working to regain motion on the fingers, wrist and forearm is extremely important. Once motion is regained, it is rarely significantly lost.
The fingers are the first priority. Even before surgery, patients should work to keep their fingers moving. Working the fingers into a tight fist and stretching them out straight should be the main two goals. One hundred times per hour sounds like a lot, but that is less than twice per minute, and the hand won’t be doing much else to start with. Once the fingers are moving freely, then such intensity is no longer required.
If the fracture is stable, or after it has been surgically stabilised, then wrist and forearm motion can begin. A splint may help for comfort, but it is very important that this be removed many times per day to allow gentle exercises.
Don’t forget the shoulder and elbow! Although these joints are usually uninjured, they can become stiff if they are ignored, especially if left in a sling. Reaching up to the sky a few times a day should be enough to stretch the shoulder. Straighten the elbow fully too. When elbows get stiff, they tend to loose the ability to straighten.
3. Getting back to normal.
This is the goal after all. Normal does not come all at once. Some light activities will be possible quite quickly, such us personal hygiene, eating and desk work. Activities involving heavy loading must be avoided until clearance is given, usually at 8 weeks.
I always encourage patients to use their hands as much as possible while recovering, as it aids in the recovery. As long as jobs numbers 1 and 2 aren’t forgotten about.
Fear of “having something go wrong” can lead to delayed recovery. Patients who avoid their exercises and leave a splint on are not doing themselves favour! Even worse is when the arm is held protectively by the side in a sling. This will almost certainly lead to delayed recovery.
Driving will be possible when the patient is able to confidently control their vehicle. This will vary widely from patient to patient, and depend also on their car. Their is no fixed time point at which this will be possible, nor is it possible for a doctor to accurately determine if the patient is safe to drive, without having access to a driving simulator. Ultimately, the responsibility reverts to the patient, who must feel able and in control. It is unusual that driving would be safe before 2-3 weeks following surgery, though there are exceptions.